When it comes to cavity progression, there are five main stages. This is your body’s way of trying to let you know that something not-so-great is going on.
Not only are we going to dive into the progression of decay, but also into some general solutions at each stage.
Which is why we have to preface (yes, again) that good home-care with proper tools and regular visits are not only preventative in nature but imperative in making sure that the condition does not get worse.
1. Stage One: Demineralization
This is where you start to see the handiwork done by sugars and acids attacking the tooth enamel. The hardness of the tooth is essentially being compromised. You’ll notice chalky white spots forming and often times they will darken as they are more prone to stains. These spots are letting you know that the enamel is demineralizing because calcium is being lost.
The steps you need to take at this point:
At this stage of cavity progression, the tooth can be naturally restored and the damage reversed with the help of diligent oral hygiene, office fluoride treatments, prescription toothpastes, and the minerals that are present in your saliva. Make changes to your diet and eat foods that promote remineralization(like cheese & milk), and avoid foods that cause demineralization
2. Stage Two: Enamel Decay
This is where the surface enamel continues its march to erosion. Once the decay breaks through the surface enamel, it’s likely you will need a dental filling to halt the bacterial progression and restore a protective layer. You may experience some sensitivity/pain at this point or you might not feel anything at all.
Waiting for pain is a bad game to play, because that means more damage has been done. It’s more cost-effective to fix things when they are small not to mention who really likes to have tooth pain?! (Not us!)
The steps you need to take at this point:
If your dentist says you need to have a filling done. Get the filling. Don’t wait and let the decay increase the area of damage and move deeper into the tooth. At this point the lesion isn’t very large and a composite filling will usually solve the problem.
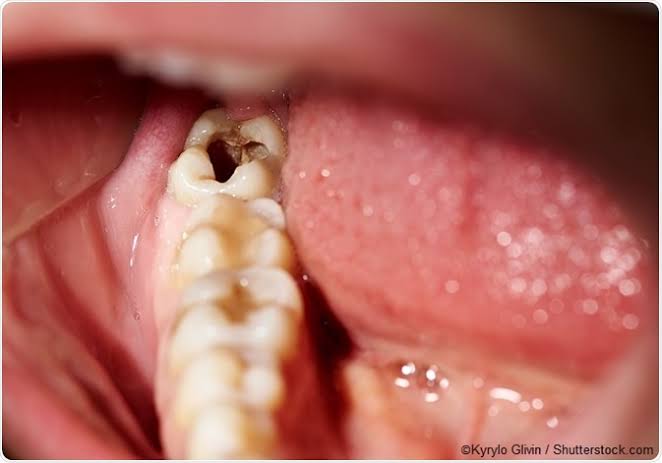
3. Stage Three: Dentin Decay
At this level of cavity progression, tooth decay starts to hurt. This is because the decay has gained access to the nerves (remember those little canals we mentioned before? They’re like slip-n-slides right to the heart of your tooth). While the decay is going deeper into that tooth it’s also rapidly destroying the softer dentin layer below the enamel.
The steps you need to take at this point:
To stop the bacterial progression at this stage a larger restoration will typically be needed. This will keep the decay from getting to the vital part of the tooth, the pulp. The type of restoration you need at this point can vary. Again, depending on how long the bacteria has gone unchecked & how much damage it has done.
A dentist may use a larger composite filling, or an inlay (although these aren’t too common since insurances typically try to down-grade& pay for fillings. But cash patients can typically reap the benefits of an inlay).
If your cavity is too large for those types of restorations (aka more tooth structure needed to be removed and repaired), then it will require a major restoration. Such as an onlay which conserves more natural tooth structure than a crown, or a dental crown which is basically a rebuild of the entire tooth structure above the gums.
4. Stage Four: Pulpal Decay
At this stage, we’re not going to lie, you’re probably going to be hurting. You’ll know something’s wrong, and if it’s gotten this far, you’re going to need a root canal to clean out the bacterial infection. This is because pus is irritating the tissues, making the nerves, blood vessels, and connective tissue in the pulp die.
The steps you need to take at this point:
Obviously, you’ll need to see a dentist. Depending on the severity of the pulp damage your dentist may even refer you to a root canal specialist (aka an endodontist). The endodontist will clear out the infection that is in the tooth root. After the root canal treatment is preformed, in a week or so you’ll return for a follow-up. If the tooth is healing fine then you’ll be cleared to return to the dentist.
Seeing your dentist after a root canal is a must, as they will permanently seal the canal and restore the part of your crown that was damaged.
We see this happen all too often where a patient no longer feels pain so they don’t finish treatment, but then end up needing another root canal!
5. Stage Five: Abscess Formation
This is the final stage in cavity progression. At this stage, the pulp is damaged. Bacteria and decaying pulp remnants cause an infection at the tip of the tooth’s root. Thus, a pus-filled pocket forms.
The infection impacts the rest of the tissues surrounding the pulp and bone material. There’s typically going to be swelling and lots of pain. The side of your face by the abscess may even be swollen.
What’s scary is you might not feel any pain until things get really really bad and then the pain is intense. However, regular trips to the dentist should catch the abscess in radiographs which means you can take action before you experience any real pain.
The steps you need to take at this point:
You’ll pretty much need a root canal (in order to try and save the tooth), and/or you might need have surgery to open the abscess and drain it. Both typically require antibiotics. If the tooth cannot be saved, then you might have to have the tooth extracted.
Missing teeth come with their own set of progressive problems so this should try to be avoided if possible. However, if the tooth is lost, then a dental implant could be a great option to replace it.
Dentalgist